Setting Up Your Environment
Let's start by setting up the environment we will need for Tour de Whirlpool.
Preparing a development environment
First we will set up the tools needed to create and execute programs. Let's set up the tools in the following order.
Solana CLI
This application allows us to use Solana from the terminal or command line.
Refer to the this page to install the command line tools.
After installing the tools, verify the Solana CLI version on the command line. There should be no problem with version 1.10.8 or later.
$ solana --version
solana-cli 1.10.8 (src:623ac656; feat;1122441720)
Visual Studio Code
This tutorial will use Visual Studio code as a TypeScript development environment. If you already have a preferred environment, feel free to skip installing Visual Studio Code.
Download the installer from the official link: https://code.visualstudio.com/download.
Verify the installation was successful by starting the application.
Node.js
We will set up Node.js to enable running TypeScript outside of a browser environment.
Download the installer from the official link, and choose the recommended LTS version: https://nodejs.org/en/download/package-manager
After completing the installation, verify the node version in the terminal or command prompt. There should be no problem with version 16.8.0 or later.
$ node -v
v16.8.0
Make sure you can run the npm command, which should have been installed at the same time.
$ npm -v
7.21.0
ts-node
The node command can execute JavaScript code. We will use the ts-node command to make it easy to execute TypeScript with Node.js. Run the following command in the terminal or command prompt to install ts-node.
npm install -g ts-node
After completing the installation, verify the ts-node version in the terminal or command prompt.
ts-node
v10.7.0
Create the directory structure for development
Create a directory (folder) to store the files created during development.
Create directories
Move to a directory where you can freely create new directories. Then, create a directory named tour_de_whirlpool.
Run the following commands in the terminal or command prompt.
cd somewhere
mkdir tour_de_whirlpool
cd tour_de_whirlpool
mkdir src
Install the Whirlpools-SDK and other libraries needed for development
To interact with Whirlpools we will install the Whirlpools-SDK and its dependency, the Solana library.
Run the following commands in the terminal or command prompt from the tour_de_whirlpool directory.
npm init -y
npm install @orca-so/whirlpools-sdk
npm ls
You can verify the installation was successful by checking the output of the npm ls command, which should show "@orca-so/whirlpools-sdk@0.11.8"
There should be no problem if the version is later than 0.11.8.
$ npm init -y
Wrote to /tour_de_whirlpool/package.json:
{
  "name": "tour_de_whirlpool",
  "version": "1.0.0",
  "description": "",
  "main": "index.js",
  "scripts": {
    "test": "echo \"Error: no test specified\" && exit 1"
  },
  "keywords": [],
  "author": "",
  "license": "ISC"
}

$ npm install @orca-so/whirlpools-sdk
added 738 packages, and audited 739 packages in 50s
39 packages are looking for funding
run `npm fund` for details
found 0 vulnerabilities

$ npm ls
tour_de_whirlpool@1.0.0 .../tour_de_whirlpool
└── @orca-so/whirlpools-sdk@0.11.8
We only install "Whirlpools-SDK" explicitly, but its dependency, the Solana library, is installed at the same time, so we are able to use it in our program as well.
The node_modules directory should have been created in the current directory. Check the directory and verify that several libraries have been installed.
$ ls node_modules
@babel
@ethersproject
@metaplex-foundation
@orca-so
@project-serum
@solana
...
...
uuid
webidl-conversions
whatwg-url
ws
Create a typescript configuration file
We will use tsconfig.json to configure TypeScript settings.
Create a file named "tsconfig.json" in the tour_de_whirlpool directory and add the following contents.
{
  "compilerOptions": {
    "types": ["mocha", "chai"],
    "typeRoots": ["./node_modules/@types"],
    "lib": ["es2015"],
    "module": "commonjs",
    "target": "es6",
    "esModuleInterop": true,
    "resolveJsonModule": true,
    "moduleResolution": "node"
  }
}
Prepare a development wallet
Let's create a Solana wallet (account) to use in this tutorial.
The wallet will be set up to work with Phantom, Typescript, as well as the Solana CLI. By doing this, we will be able to perform one-off actions and do manual verifications with Phantom and the CLI, but we will also be able to use the same wallet in our programs.
Note: Because this wallet will be used in programs, be sure to keep it separate from any wallet holding actual assets. It would be a terrible to see your Solana assets wiped out due to an error in your code.
Create a Chrome profile
Because Phantom can manage multiple wallets, it is possible to add a new wallet to the Phantom wallet you are currently using. However, to avoid accidents, it is recommended that you create a new Chrome profile and keep your Phantom instances separate.
Use the following procedure to create a new profile.
You can set your profile theme to customize the appearance. Making the appearance different from the profile you normally use, or other development environments, will make it easier to differentiate.
Here is an example of a profile for daily use (left) vs a dedicated profile for the tutorial (right). This greatly reduces the risk of mistakenly interacting with the wrong profile. (Red means beware!)
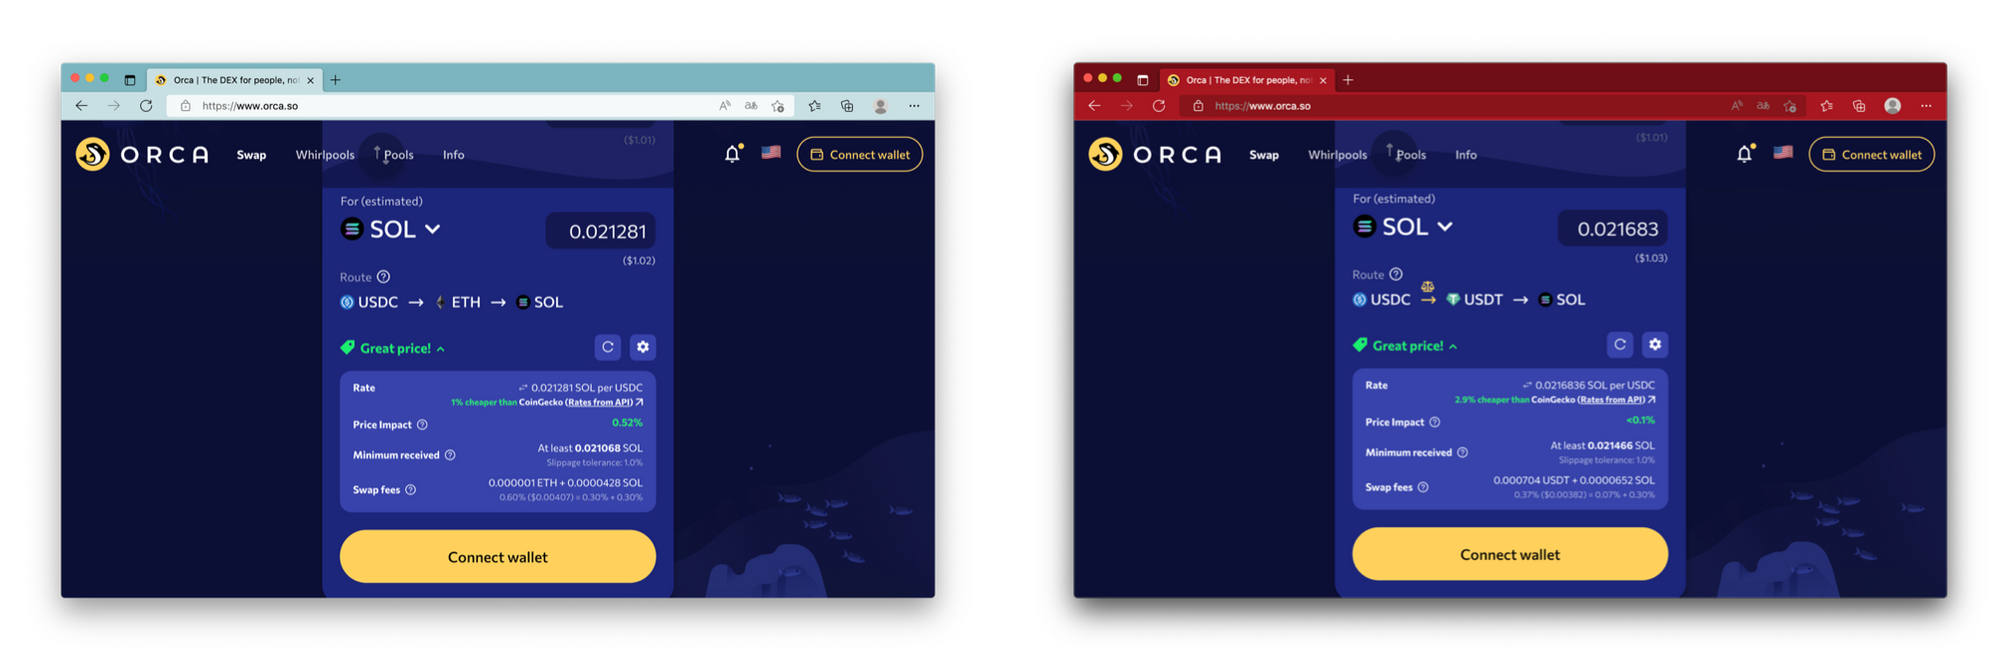
Besides using different profiles, using separate browsers is another way to differentiate. If you normally use Chrome, you can try using Edge or Brave for development.
The advantage of using this method is that you can avoid the hassle of having to switch profiles.
Install Phantom
Extensions are managed separately for each profile. Because of this, your newly created profile will not include the Phantom extension. Install Phantom again in your new profile.
You can install Phantom by clicking on the relevant browser icon link at the bottom of this page.
Once the installation is complete, follow the on-screen instructions to initialize a new wallet.
Once the installation is complete, follow the on-screen instructions to initialize a new wallet.
Now your new wallet has been initialized.
Let's go ahead and change the name of the new wallet to "TourDeWhirlpool".
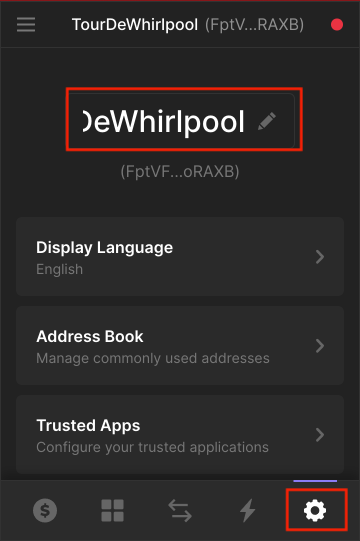
Change the target cluster connection
Tour de Whirlpool uses Devnet, a Solana network used for development.
Change the target network to Devnet.
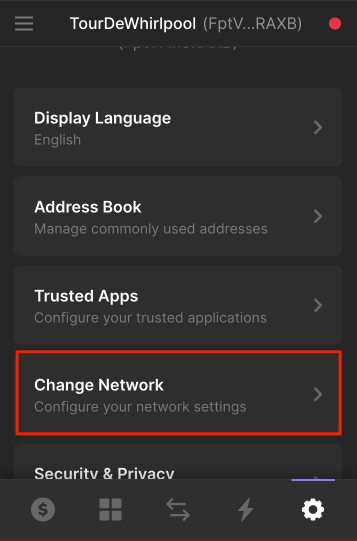
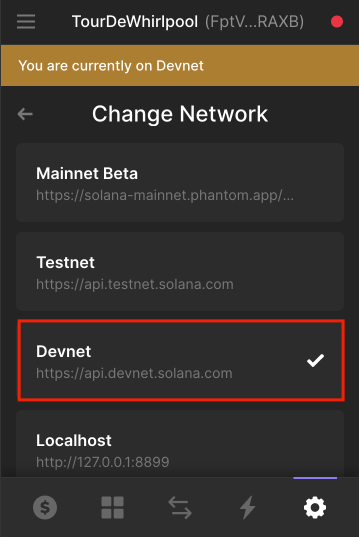
Export the wallet created in Phantom
Currently, the private key for your wallet only exists inside Phantom.
As is, you cannot perform actions with your new wallet from TypeScript programs or the Solana CLI.
To solve this, we can export the private key, and save it in a format that can be read in by TypeScript and the Solana CLI.
First, save a file named create_wallet_json.ts including the following code in your tour_de_whirlpool directory.
// create_wallet_json.ts
import bs58 from "bs58";

const wallet_json = "wallet.json";

const readline = require('readline').createInterface({
    input: process.stdin,
    output: process.stdout
});

readline.question('secretKey(base58):', (secret_base58) => {
    readline.close();
    const secret_bytes = Uint8Array.from(bs58.decode(secret_base58.trim()));

    // write file
    const fs = require('fs')
    fs.writeFileSync(wallet_json, `[${secret_bytes.toString()}]`);

    // verify file
    const secret_bytes_loaded = JSON.parse(fs.readFileSync(wallet_json));
    const secret_base58_loaded = bs58.encode(Uint8Array.from(secret_bytes_loaded));
    if ( secret_base58 === secret_base58_loaded ) {
        console.log(`${wallet_json} created successfully!`);
    }
});
Next, return to Phantom and export your private key. When the key is displayed, copy it to your clipboard.
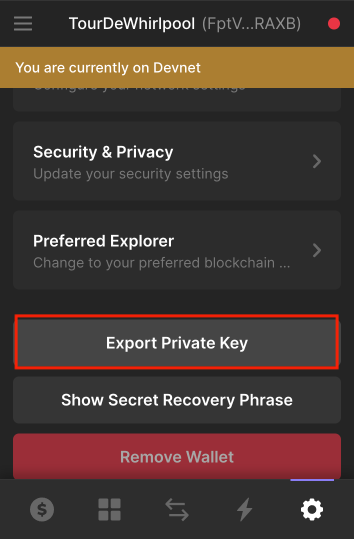
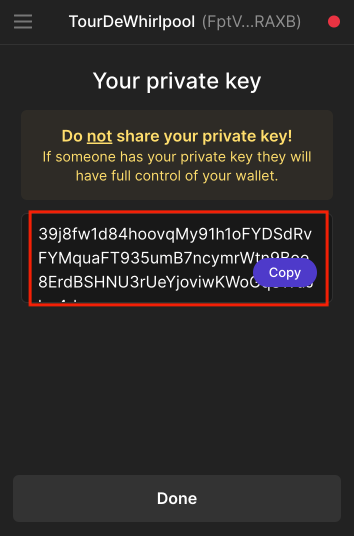
In the terminal or command prompt, navigate to the tour_de_whirlpool directory and execute create_wallet_json.ts using ts-node.
When the program displays "secretKey(base58):", paste the private key you copied into your clipboard and press ENTER.
Verify that the output says "wallet.json created successfully!"
$ cd tour_de_whirlpool
$ ts-node create_wallet_json.ts secretKey(base58):xxxxxxxxxxxxxxxxxxxxxxxxxxxxxxxxxxxxxxxxxxxxxxxxxxxxxxxxxxxxxxx wallet.json created successfully!
Use the Solana CLI to display the public key, using the file you just created as a base. Verify that it matches the public key displayed in Phantom.
$ solana address -k wallet.json
FptVxxxxxxxxxxxxxxxxxxxxxxxxxxxxxxxxxxxxxRAXB
In the procedure above we are going out of our way to use a program to convert the key. You may find sites online that will convert the key for you, but do not use these sites! If the site creator is a bad actor they can save your key and use it maliciously. Please perform all key conversions in your own environment.
Now your development environment is ready to go!